The last thing to organise was the food. Birthday cake, cupcakes, two types of biscuits, drinks and the lunch food.
Since the party was at lunch time I asked each partygoer to bring along a plate of their favourite sandwiches. I prefer to cater my own events but I was very conscious of keeping the stress low and the fun high for this party, so I enlisted help. Sandwiches are easy, inexpensive, well-received and everyone has a favourite.
I also had plain crackers, bbq crackers, carrot sticks, celery sticks and a pack of supermarket dips.
Sweets included the birthday cake - vanilla cake with chocolate buttercream and fondant - and I used the same recipes for the cupcakes. Lemon dinosaur biscuits and chocolate Transformer biscuits, both with coloured royal icing.
Top left: Food table with sandwich plates and party hats.
Top right: Optimus Prime birthday cake.
Cake recipe: Allrecipes - Best sculpted cake recipe EVER! I omitted the milk though. This recipe makes one perfect 8 inch round cake, I made two and layered my cakes with chocolate buttercream.
Fondant recipe: Allrecipes - I replaced the corn syrup with liquid glucose (easier to find in Australia) and used three tablespoons of rice bran oil instead of the oil and shortening. This recipe was SO easy, quick and inexpensive. I made it by hand, stored it in the fridge for two weeks and the fondant rolled perfectly, coloured perfectly and did not dry out as quickly as the store bought stuff.
Middle: Cupcakes with fondant Transformer cutouts.
The decorations on top are Transformer cut-outs from fondant and brushed lightly with silver edible luster dust.
Bottom left: Lemon dinosaur sugar cookies with royal icing.
Recipe: Acorn Advisors - I made the lemon version
Bottom right: Chocolate Transformer badge biscuits with royal icing.
Recipe: I altered the lemon sugar cookie recipe above, eliminating the lemon and replacing some of the flour with cocoa
All the sweets were devoured and the sandwiches were a hit! Especially with the kids :)
Please note: the Transformer badge biscuits and cupcake Transformer decorations are courtesy of the Transformers Play Doh kit. Thank you Play Doh for stepping up! I couldn't find 'real' cookie cutters anywhere but this kit saved the day!
Roll out your cookie dough and fondant using 6mm dowel rods as your spacers and the cutters work like a dream :)
Showing posts with label Cooking. Show all posts
Wednesday, May 16, 2012
Thursday, January 26, 2012
It's birthday crafting all round!
My absence can be explained with two words, Extraordinarily Busy!
By far my biggest (both in time and physical size) project so far this month has been my Mother-in-law's Birthday quilt. I had originally umm'd and ahh'd over whether I should do it for Christmas but I was terribly afraid of working with stretchy fabrics on a large scale again. I gave myself a mental shake instead and decided I would try the blasted thing and if it sucked, so what? But if it was good then great!
Originally she had described this quilt to me as something she had seen many years ago and had always wanted. I searched the internet for panne velvet checkerboard quilts and came up with absolutely nothing. There were heaps of quilts, some patchy velvet ones, but none in a simple checkerboard with vibrant, jewel colours. Happily, she loved the gift which is fantastic given the hours of arranging, cutting and re-placing my husband and I had to do, not to mention the sewing. This was all completed on a basic sewing machine with no special foot.
Please note, the colours are quite off in the pictures. They are ruby, emerald, sapphire, gold and violet in reality :) backed with plain chocolate brown. 2.5m x 3m of velvety goodness.
Then our contribution to the party was a strawberry and cream filled chocolate cake with chocolate buttercream. Yum!
By far my biggest (both in time and physical size) project so far this month has been my Mother-in-law's Birthday quilt. I had originally umm'd and ahh'd over whether I should do it for Christmas but I was terribly afraid of working with stretchy fabrics on a large scale again. I gave myself a mental shake instead and decided I would try the blasted thing and if it sucked, so what? But if it was good then great!
Originally she had described this quilt to me as something she had seen many years ago and had always wanted. I searched the internet for panne velvet checkerboard quilts and came up with absolutely nothing. There were heaps of quilts, some patchy velvet ones, but none in a simple checkerboard with vibrant, jewel colours. Happily, she loved the gift which is fantastic given the hours of arranging, cutting and re-placing my husband and I had to do, not to mention the sewing. This was all completed on a basic sewing machine with no special foot.
Please note, the colours are quite off in the pictures. They are ruby, emerald, sapphire, gold and violet in reality :) backed with plain chocolate brown. 2.5m x 3m of velvety goodness.
Then our contribution to the party was a strawberry and cream filled chocolate cake with chocolate buttercream. Yum!
Time flies, allow me to recap...
In attempting to find where the time has gone, I felt compelled to make a list. I have had 2 months free of study and swore to myself that after Christmas I would devote plenty of time to my own artwork and build a nice little library of work. While I did manage to complete 3 new pen drawings and an inked drawing, I didn't manage anywhere near what I planned. My wall is still full of post-its with ideas, plans and random names for artwork :(
In no particular order:
How has your summer (or winter) been so far? Have you achieved what you wanted?
Don't forget you can always fit in those missed projects in the future!
In no particular order:
- Hosted Christmas dinner
- Prepared my son for his first year of school including all prerequisite uniform, stationery, backpack, lunchbox, textbook and accessory shopping. That quite frankly deserved a month all to itself
- Hosted and promoted my first blog giveaway on two blogs
- Opened an Etsy store
- Sewed a panne velvet quilt
- Baked a three tier chocolate cake, shortbread, sugar cookies, marshmallow slice, chocolate coated marshmallows and pretzels for dozens
- Sewed 7 baby dresses, 5 headbands and made a dozen hairclips
- Sewed a dinosaur pillow, wrist cuffs and made a customised dinosaur dig
- Painted 5 shirts, a golf towel and made tulle pom poms for decorations
- Put together 8 baby and child gift hampers for donation
- Did the Christmas shopping!
- Took the kids for a photo with Santa, attended a Christmas concert and a graduation
- Made a flogger and tickler
- Had a short holiday - the first as a family of four
- Painted a swan portrait
- Played with a DSLR camera for the first time
- Had a Christmas party and organised a Secret Santa
- Kept blogging AND Facebooking :)
- Participated in various Etsy treasury-making and promotion
- Watched my son ride his first big-boy bike and scooter, saw my daughter stand for the first time, cut new teeth and do a handstand
- Got my hair done, woot!
- Read at least six new books - that's right, start to finish, I feel your envy :)
- Lost weight, not quite as much as I would have liked but I haven't regained any. Don't let the door hit you in the ass, weight!
- Drew pictures, played Search and Find, built transformers and read stories with my son
- Cuddled, sang to and played with my daughter
- Spent time with my husband, we even saw at least one good dvd (though the rest were crap, thanks Hollywood)
- Took on extra page-layout work, voluntary work and I-don't-get-paid-for-this extensive promoting, networking and random business crap that's supposed to make people notice me
- Laughed, cried, was amazed and schocked
- Spent too much time anxious or depressed, but got over it
- Did all the regular stuff that helps keep the home and family going
How has your summer (or winter) been so far? Have you achieved what you wanted?
Don't forget you can always fit in those missed projects in the future!
Thursday, January 19, 2012
Going black
Today I'm going black to support the anti SPOA and PIPA movement.
Do you want your internet censored? Do you want your web page under scrutiny by the government? Do you want to risk being closed down because some big business thinks you are impinging on their copyright? Don't risk the amazing and free-spirited voice of the internet that has been creating and supporting individual voices for years.
Piracy is the worst type of theft, stealing other's hard-earned ideas and creations is the most despicable form of flattery. But these laws are not the way to protect us.
Do you want your internet censored? Do you want your web page under scrutiny by the government? Do you want to risk being closed down because some big business thinks you are impinging on their copyright? Don't risk the amazing and free-spirited voice of the internet that has been creating and supporting individual voices for years.
Piracy is the worst type of theft, stealing other's hard-earned ideas and creations is the most despicable form of flattery. But these laws are not the way to protect us.
Saturday, October 29, 2011
Fruity jelly cups recipe - the deliciously healthy treat
I have been meaning to write up a recipe for jelly cups for ages, but never seemed to find the time.
These are my go-to saviours when it comes to pre-school parties, 'bring a plate' events and last minute 'Mum, I feel like something yummy' treats. They're simple, easy and most of all HEALTHY! Yay!
Ingredients:
Fruit juice (pictured: apple) - pick a 100% juice for maximum goodness
Gelatin or alternative
Fruit - (pictured: tinned peaches and grapes) a mix of fresh and tinned is delicious
Water
Lollies (pictured: Natural Confection Company snakes) only for treats :)
Equipment:
Large measuring jug
Small measuring jug
Spoon measures
Knife
Cups/bowls/disposable cups
Cookie tray
1. The mathematical bit. Grab your cup and fill it about halfway with water, take note of the measurement. Multiply your measurement by the number of cups you want to fill. This is how much juice you need, pour it into the large measuring jug.
2. Chop your fruit into chunks. I love tinned peaches, fresh grapes, fresh pears and fresh cherries but any fruit is good. Come to think of it I probably wouldn't use bananas, I don't think they would like to be immersed in jelly for too long.
3. Evenly distribute your fruit in your cups.
4. My gelatin pack says 1 tablespoon dissolved in 100mLs of water will set 400mL of liquid. That's about right but I heap my tablespoon measures slightly to ensure a firm set. Use 3 heaped tablespoons of gelatin dissolved in 1 cup of boiling water. Add the gelatin mix to the fruit juice. Stir well, don't let the mix sit too long or it will set.
5. Evenly distribute the juice mix between your cups.
6. Optional: Carefully arrange snakes over the side of the cups, with about half the snake in the fruit mix.
7. Pop the cups on a cookie tray and set in the fridge for a few hours.
You get to control exactly what goes into these sweet treats and the recipe can be altered to suit any palette.
Notes:
Enjoy!
These are my go-to saviours when it comes to pre-school parties, 'bring a plate' events and last minute 'Mum, I feel like something yummy' treats. They're simple, easy and most of all HEALTHY! Yay!
Ingredients:
Fruit juice (pictured: apple) - pick a 100% juice for maximum goodness
Gelatin or alternative
Fruit - (pictured: tinned peaches and grapes) a mix of fresh and tinned is delicious
Water
Lollies (pictured: Natural Confection Company snakes) only for treats :)
Equipment:
Large measuring jug
Small measuring jug
Spoon measures
Knife
Cups/bowls/disposable cups
Cookie tray
1. The mathematical bit. Grab your cup and fill it about halfway with water, take note of the measurement. Multiply your measurement by the number of cups you want to fill. This is how much juice you need, pour it into the large measuring jug.
Juice left, gelatin and water right.
2. Chop your fruit into chunks. I love tinned peaches, fresh grapes, fresh pears and fresh cherries but any fruit is good. Come to think of it I probably wouldn't use bananas, I don't think they would like to be immersed in jelly for too long.
3. Evenly distribute your fruit in your cups.
4. My gelatin pack says 1 tablespoon dissolved in 100mLs of water will set 400mL of liquid. That's about right but I heap my tablespoon measures slightly to ensure a firm set. Use 3 heaped tablespoons of gelatin dissolved in 1 cup of boiling water. Add the gelatin mix to the fruit juice. Stir well, don't let the mix sit too long or it will set.
5. Evenly distribute the juice mix between your cups.
6. Optional: Carefully arrange snakes over the side of the cups, with about half the snake in the fruit mix.
7. Pop the cups on a cookie tray and set in the fridge for a few hours.
You get to control exactly what goes into these sweet treats and the recipe can be altered to suit any palette.
Notes:
- Use disposable cups and spoons for picnics, bbqs, school parties and bring-a-plate events
- Use transparent cups and orange juice/apple and raspberry juice/green-tinted apple juice for ghoulish Halloween jellies. Add some snakes or crumbled cookie 'grave dirt' and worms
- Jellies set in a few hours
- GREAT for babies and toddlers. Use a mild juice like apple or pear and water down as needed and add soft or stewed fruits. Babies practice chewing on the jelly, without the hazard of choking and you can introduce the flavours and fruits you want.
Enjoy!
It's all fun and games till someone gets murdered with a butcher knife
Hot on the heels of our jack-o-melon escapades came our family Halloween party. Loads of fun!
We had spider (chicken and corn pot) pies, chocolate spider biscuits with strawberry legs, snake jellies and balanced it all out with an unhealthy amount of m&ms and salted peanuts. mmmmmmmmmm
Spiders biscuits were inspired by these amazing treats and I used the recipe for these scrumptious cookies.
With the cookie recipe I tweaked it a bit due to time restraints. I eliminated the whole choc chips and used Sweet Williams lactose free chocolate chips for the melted choc. Seriously delicious but I would not recommend the recipe for these double, icing filled concoctions. The biscuit recipe is just too rich to really be able to enjoy these creepy crawlies. The filling is regular icing made with icing sugar and a little butter and the legs are strawberry licorice snipped into skinny threads. These would be phenomenal with a light filling and homemade blackcurrant or blueberry roll-ups for the legs.
Spider pies inspired by these yummy tentacle pies. I just made a quick chicken and corn pie filling from shredded bbq chicken, frozen corn kernel a basic white sauce and some concentrated chicken stock. Delish!
We topped it all off with Monsters Inc for Xavier, followed by Scream 4 and Pirates 4 + snuggles on the couch with the Mr.
Jelly cups recipe coming right up...
We had spider (chicken and corn pot) pies, chocolate spider biscuits with strawberry legs, snake jellies and balanced it all out with an unhealthy amount of m&ms and salted peanuts. mmmmmmmmmm
Spiders biscuits were inspired by these amazing treats and I used the recipe for these scrumptious cookies.
With the cookie recipe I tweaked it a bit due to time restraints. I eliminated the whole choc chips and used Sweet Williams lactose free chocolate chips for the melted choc. Seriously delicious but I would not recommend the recipe for these double, icing filled concoctions. The biscuit recipe is just too rich to really be able to enjoy these creepy crawlies. The filling is regular icing made with icing sugar and a little butter and the legs are strawberry licorice snipped into skinny threads. These would be phenomenal with a light filling and homemade blackcurrant or blueberry roll-ups for the legs.
Spider pies inspired by these yummy tentacle pies. I just made a quick chicken and corn pie filling from shredded bbq chicken, frozen corn kernel a basic white sauce and some concentrated chicken stock. Delish!
We topped it all off with Monsters Inc for Xavier, followed by Scream 4 and Pirates 4 + snuggles on the couch with the Mr.
Jelly cups recipe coming right up...
Saturday, May 7, 2011
4th birthday already?!
My little X turned 4, wow.
To celebrate we had dinosaurs galore. Dinosaur cupcakes for preschool (that was a cheat since I used dinosaur sprinkles on chocolate cupcakes, lol), dinosaur balloons for his birthday BBQ, dinosaur birthday cake decorated in fondant dinosaurs.
I swear, what that kid doesn't know about dinos is not worth knowing.
Layered chocolate and strawberry cake (by request) filled with cream and fresh strawberries, covered in buttercream and fondant dinosaurs. Special thanks to Sylvia at A Baked Creation for the inspirational dino sculptures!
I made my own royal icing for the cookies, a few tablespoons of sifted icing sugar mixed with half a tablespoon of Pavlova Magic (a cheap and easy-to-find replacement for meringue powder) and a drop of water, coloured with gel icing colours.
The BBQ was a hit! With sausages, hamburgers, salads and great company it was a bright spot for an Autumn day.
To celebrate we had dinosaurs galore. Dinosaur cupcakes for preschool (that was a cheat since I used dinosaur sprinkles on chocolate cupcakes, lol), dinosaur balloons for his birthday BBQ, dinosaur birthday cake decorated in fondant dinosaurs.
I swear, what that kid doesn't know about dinos is not worth knowing.
Layered chocolate and strawberry cake (by request) filled with cream and fresh strawberries, covered in buttercream and fondant dinosaurs. Special thanks to Sylvia at A Baked Creation for the inspirational dino sculptures!
Then we needed dinosaur cookies of course...
I found Brachiosaurus, Stegosaurus, T-Rex and Triceratops cutters so we had them in red, yellow, green and blue royal icing. Thanks to Nigella Lawson for the cut-out cookie recipe, it was a total hit!
I made my own royal icing for the cookies, a few tablespoons of sifted icing sugar mixed with half a tablespoon of Pavlova Magic (a cheap and easy-to-find replacement for meringue powder) and a drop of water, coloured with gel icing colours.
The BBQ was a hit! With sausages, hamburgers, salads and great company it was a bright spot for an Autumn day.
Friday, May 28, 2010
Gah! I forgot about the morning tea party at kindy tomorrow!! Recipe incl.
11.30 pm and I realise that X has a morning tea party at kindy tomorrow. He needs a funny hat and a plate of something. Crap...
Given that I am the worst morning person I know (well, apart from the hubby :P) I figure I better get this done tonight.
1 funny hat needed. Yeah right, getting a clothes-minded 3 year old to wear a cool hat you spent hours on is nigh impossible. The alternative? Snag husband's old black beanie and adorn with previously cut out Ben 10 fabric swatches that already have the fusible applique interfacing attached. Woo Hoo! If he doesn't want to wear a Ben 10 hat, I'll eat the damned thing.
1 plate of something yummy needed, no eggs (thanks to allergies in the kindy). Let's go the tried and true egg free cake mix that I used for Xavier's birthday cake. It's quick, easy, needs no weird ingredients and frankly it's bloody yummy :D. Darling husband gets roped into helping so I figure we should make a third of the mix chocolate and dye it black, a third vanilla green and a third vanilla yellow. Beats the hell out of making a dozen sandwiches that are likely to go soggy and I use a minimum of low-gi sugar so the little morsels are not even bad for them.
Here is the recipe:
Makes 1 large slab cake (see Lightning McQueen) or use half the mix to make 36 mini-cupcakes like the picture
I don't do anything fancy with this recipe:
Given that I am the worst morning person I know (well, apart from the hubby :P) I figure I better get this done tonight.
1 funny hat needed. Yeah right, getting a clothes-minded 3 year old to wear a cool hat you spent hours on is nigh impossible. The alternative? Snag husband's old black beanie and adorn with previously cut out Ben 10 fabric swatches that already have the fusible applique interfacing attached. Woo Hoo! If he doesn't want to wear a Ben 10 hat, I'll eat the damned thing.
1 plate of something yummy needed, no eggs (thanks to allergies in the kindy). Let's go the tried and true egg free cake mix that I used for Xavier's birthday cake. It's quick, easy, needs no weird ingredients and frankly it's bloody yummy :D. Darling husband gets roped into helping so I figure we should make a third of the mix chocolate and dye it black, a third vanilla green and a third vanilla yellow. Beats the hell out of making a dozen sandwiches that are likely to go soggy and I use a minimum of low-gi sugar so the little morsels are not even bad for them.
Here is the recipe:
Makes 1 large slab cake (see Lightning McQueen) or use half the mix to make 36 mini-cupcakes like the picture
- 4 cups of plain flour
- 2 cups sugar
- 3 1/4 cups cocoa (reduce if you make multi-coloured cakes or omit for a vanilla or flavoured cake)
- 8 tsp baking powder
- 3 tsp vanilla essence
- 1 cup vegetable oil - I use rice bran oil. It's light, good for you and has no flavour. I have also used olive oil, you do not taste the oil in a chocolate cake but I would avoid it for a lighter flavoured cake.
- 3 cups water
I don't do anything fancy with this recipe:
- Pop all the dry ingredients into a large bowl and mix a little
- Add all the other ingredients and mix well (for multi-coloured cakes separate your mix into batches before adding the cocoa to one batch only)
- Put mix into cupcake liners/trays/cake pan (grease pans of course, unless you use silicone trays)
- Bake at 170-180 Celsius for about 30 minutes for a single slab cake, approximately 15 minutes for the cupcakes. This will vary between ovens so check your cakes periodically, cakes are cooked when the tops spring back after gently touching them.
- Drizzle with a little icing and away you go!
Thursday, May 6, 2010
A 3rd birthday, already??
My amazing little boy is growing up. We celebrated his 3rd birthday on Wednesday with a Lightning McQueen cake (edible icing images make a time-poor mum very happy) and party at kindy and presents at home that night.
The poor little guy has been sick for the last week, first a cold and then horrible wheezy asthma that always makes me nervous. So birthday time was a relaxed family night at home where he opened his little gifts and was totally thrilled with the train/car set we got him.
I stumbled across a fantastic wooden train and car set at an op-shop complete with track, roads, vehicles, houses and boom gates. And the most amazing bit? It was five bucks. Yep, that's right. And that included the great plastic tub with wheels that it was kept in. X loves it to bits and even wanted to stay home today to play with it. Given his obsession with kindy and his desire to go every single day, that was quite a complement for the gift!
I also finished a quilt cover which you can see at the bottom of the picture. I have been meaning to make a quilt for him since he was born but I am not very experienced. I made him a quilt cover instead for a standard single doona - which will dry quicker after washing during the chilly winter - and he loves it. I will post pics asap.
The poor little guy has been sick for the last week, first a cold and then horrible wheezy asthma that always makes me nervous. So birthday time was a relaxed family night at home where he opened his little gifts and was totally thrilled with the train/car set we got him.
I stumbled across a fantastic wooden train and car set at an op-shop complete with track, roads, vehicles, houses and boom gates. And the most amazing bit? It was five bucks. Yep, that's right. And that included the great plastic tub with wheels that it was kept in. X loves it to bits and even wanted to stay home today to play with it. Given his obsession with kindy and his desire to go every single day, that was quite a complement for the gift!
I also finished a quilt cover which you can see at the bottom of the picture. I have been meaning to make a quilt for him since he was born but I am not very experienced. I made him a quilt cover instead for a standard single doona - which will dry quicker after washing during the chilly winter - and he loves it. I will post pics asap.
Saturday, January 2, 2010
December craft challenge entry. Gingerbread toadstools and spicy snails
Ok, so when I first saw this challenge advertised I had two questions.
1. What type of house could I make that is out of the ordinary (kinda like me)?
2. How the hell do you make a gingerbread house?? :D
This is my first ever gingerbread anything, except for cookies. I have not even tried a kit, so if I broke any cardinal rules of gingerbread house making, I apologise.
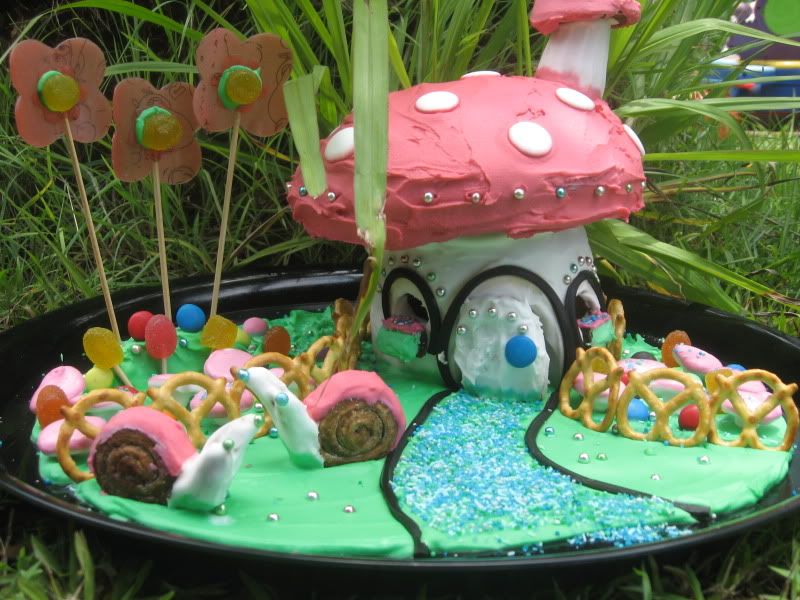
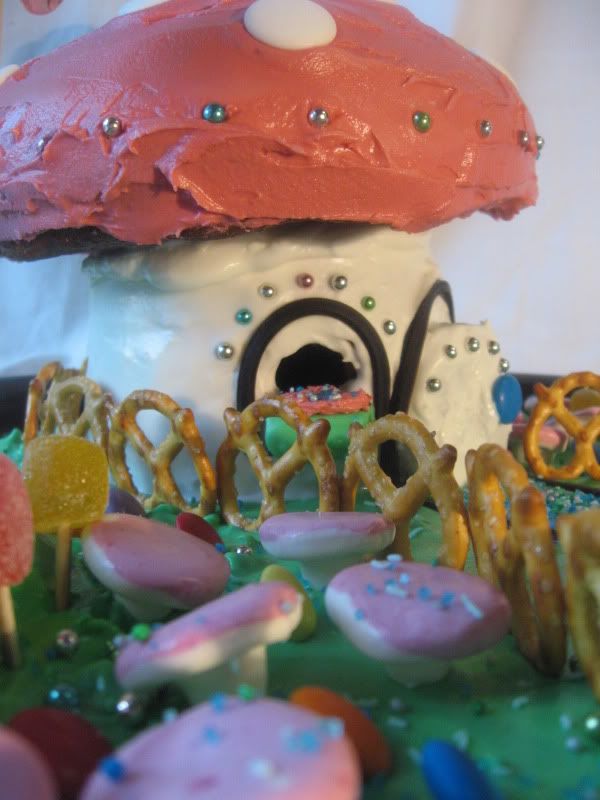
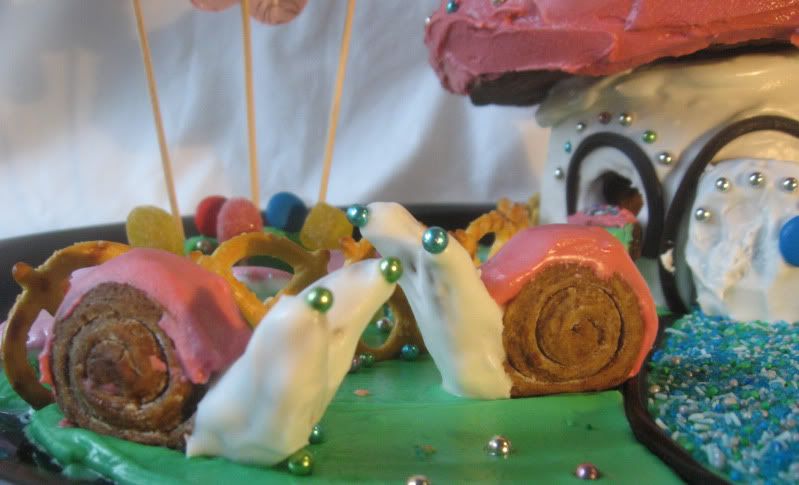
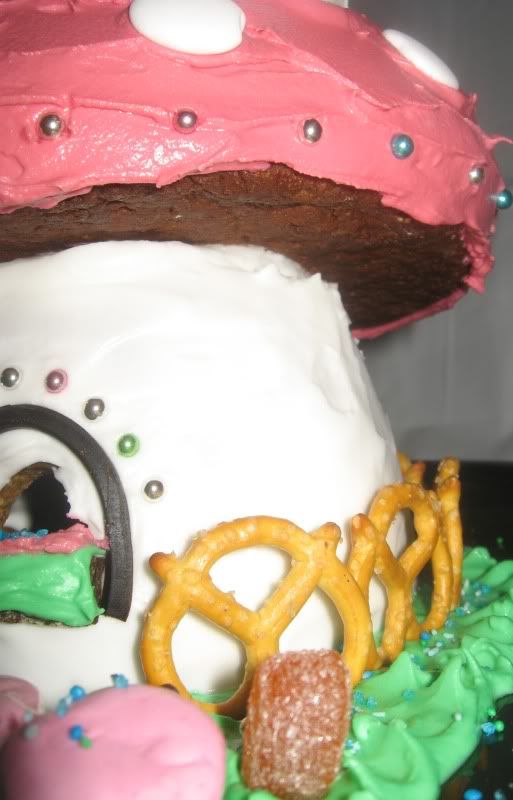
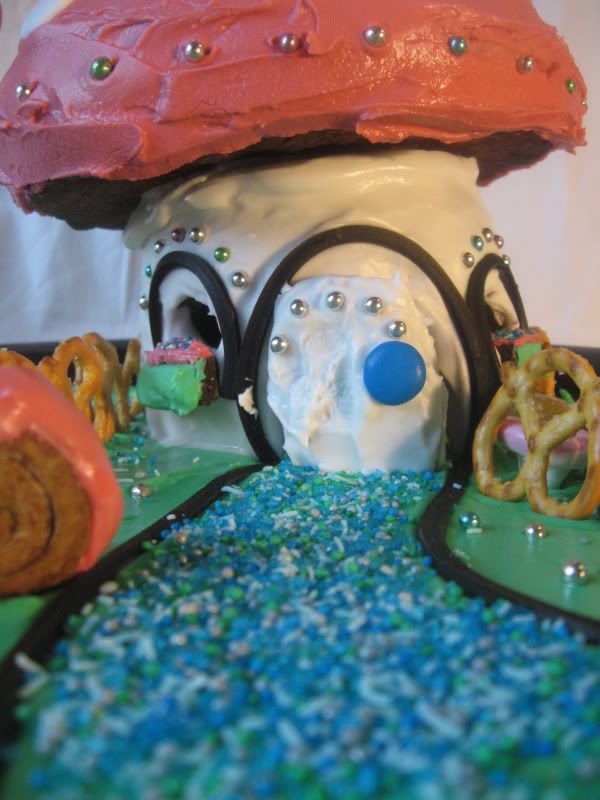
I made sure to fit the bill for this challenge: the walls, ceiling and toadstool roof are all gingerbread, as is the little second storey toadstool. The snails are gingerbread and the garden is royal icing, Smarties, Jubes jellies, Roll-up flowers and pretzel fence.
The highest point is about 22cm (9 inches) so it is a little small.
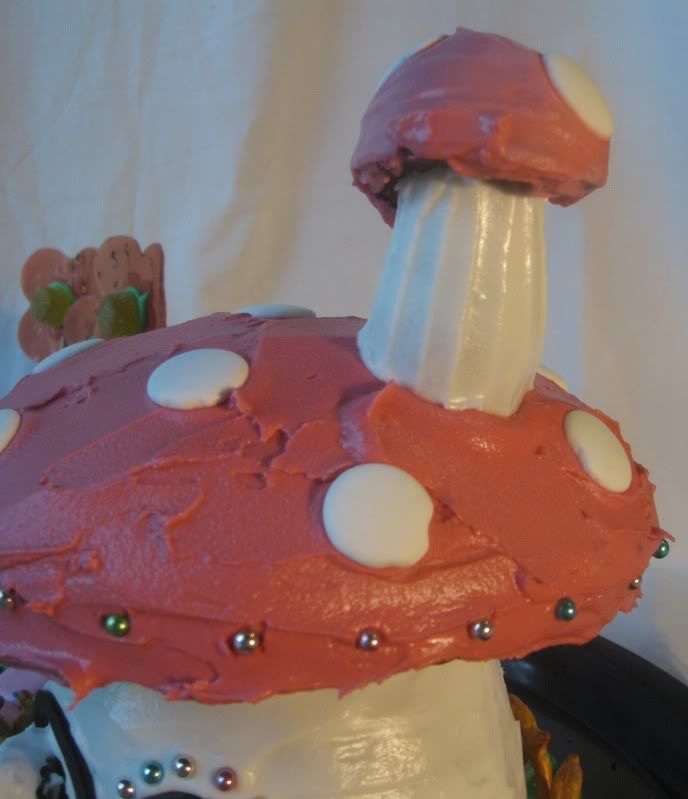
Toadstool-y goodness
Left side (note the adorable raspberry mushroom candies! DH's lucky find for me.)
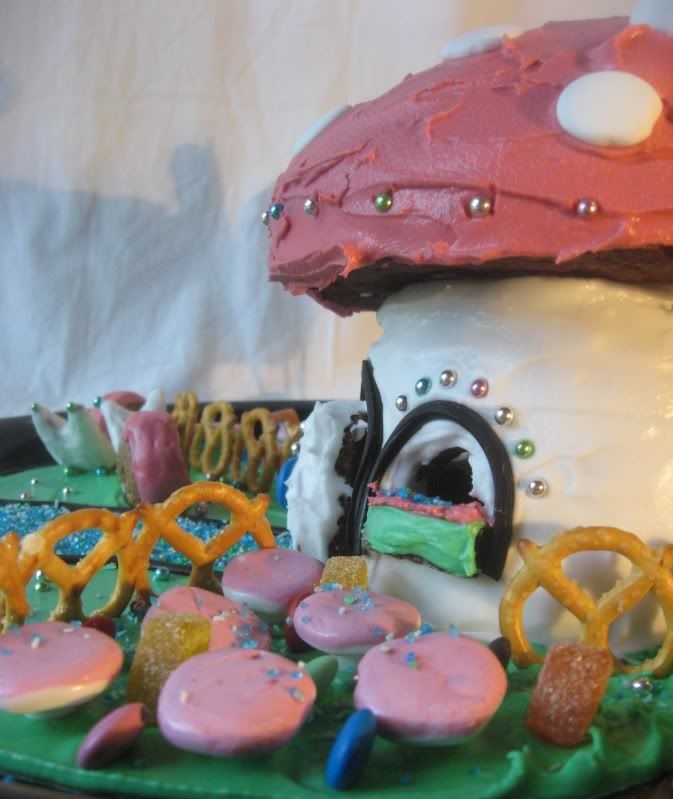
Right side
Snails with cachous eyes
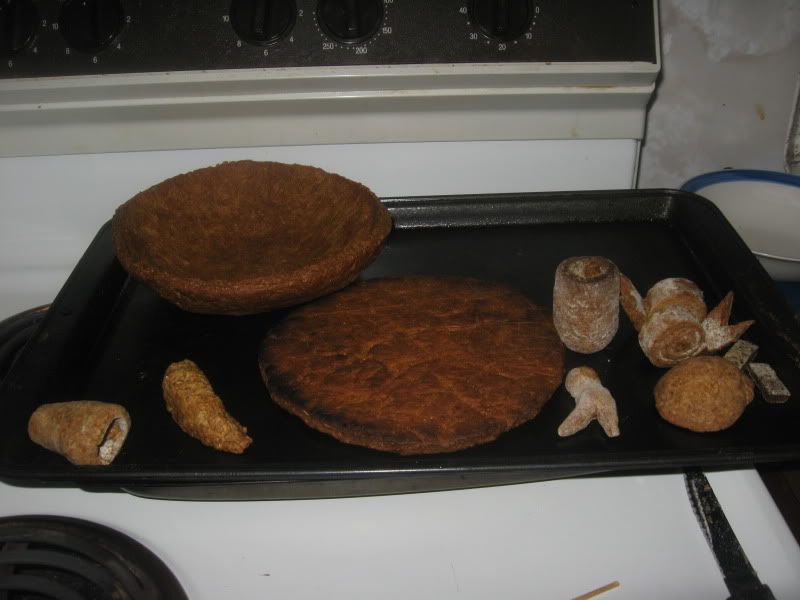
Proof of gingerbread innards ;)
Gratuitous artsy shot.
Just to defend myself, it IS supposed to be slanted, just like a real toadstool ;D.
Since I was a gingerbread novice I treated this like a sculpture/cake decorating project. I found a good gingerbread recipe online and started by using some dishes and alfoil as moulds to put the gingerbread on. The house body, flat ceiling, toadstool dome and little toadstool body and dome are all results of moulding gingerbread dough around various objects for baking. Secured together with the traditional royal icing I think it fits the bill pretty well.
1. What type of house could I make that is out of the ordinary (kinda like me)?
2. How the hell do you make a gingerbread house?? :D
This is my first ever gingerbread anything, except for cookies. I have not even tried a kit, so if I broke any cardinal rules of gingerbread house making, I apologise.
I made sure to fit the bill for this challenge: the walls, ceiling and toadstool roof are all gingerbread, as is the little second storey toadstool. The snails are gingerbread and the garden is royal icing, Smarties, Jubes jellies, Roll-up flowers and pretzel fence.
The highest point is about 22cm (9 inches) so it is a little small.
Toadstool-y goodness
Left side (note the adorable raspberry mushroom candies! DH's lucky find for me.)
Right side
Snails with cachous eyes
Proof of gingerbread innards ;)
Gratuitous artsy shot.
Just to defend myself, it IS supposed to be slanted, just like a real toadstool ;D.
Since I was a gingerbread novice I treated this like a sculpture/cake decorating project. I found a good gingerbread recipe online and started by using some dishes and alfoil as moulds to put the gingerbread on. The house body, flat ceiling, toadstool dome and little toadstool body and dome are all results of moulding gingerbread dough around various objects for baking. Secured together with the traditional royal icing I think it fits the bill pretty well.
Here are the other entries.
There are some really great entries but I still believe my design was pretty damned innovative. I kept to the brief and had walls and roof from gingerbread, all the parts were edible and the major design feat WAS the gingerbread house, not the decorations around it. But hey, I'm biased :D.
Monday, December 28, 2009
Cake balls (truffles)
Ingredients:
SUGGESTIONS:
For approximately 60-70 cake balls (depending of course on your choice of sizing) I made four packet cake mixes, two vanilla and two chocolate. I used the super cheap no-name brand but feel free to use your favourite mix or bake a cake from scratch. Let the cakes cool completely (use the fridge or freezer if you are in a hurry). Break the cakes into fine crumbs, I did that by hand but a food processor would have been fantastic. You do NOT want a sticky mud cake or something with chocolate chips, raisins or fruit for these cake bites. A fruity or chippy cake might be fine but I don't think the balls would stay together very well with chunks, and a mud cake will not crumble properly.
Then add about a cup of powdered (icing) sugar to each crumbled cake, a few tablespoons of cocoa to the choc ones and a teaspoon of vanilla to the vanilla ones. Or use your tastbuds to dictate the essences :D.
To bind, add about a third of a cup of melted butter and drizzle milk in until the balls stay together when squished. Add your wet ingredients slowly, you want to avoid gooey cake balls.
Then grab a small handful of mix and squeeze in your hand until in forms a ball. Most of ours were on the big side, lol. Pop them in the fridge for 10 minutes to harden a little and melt some chocolate while you wait. I got a 375g bag each of milk and white chocolate and that let us half-dip most of them with a few totally covered, so you may need quite a bit of chocolate to fully cover your cake balls. We dipped half the balls in chocolate and laid them down on a tray covered in baking paper and popped them in the fridge to set.
We wrapped each ball in a square of cellophane, twisted the top and secured with a little clear tape cause the buggers wouldn't stay closed. They were delicious and not too sweet like the recipes that call for a tin of premade frosting, although the recipe using cream cheese might be nice. Mine were not super soft, just soft enough to hold shape and they tasted just like the original yummy cake mix.
A banana cake or carrot cake would be delicious using cream cheese in place of the butter and milk.
- Four packet cake mixes, made according to the instructions OR four medium-sized cakes of your choice made from scratch
- Four cups of icing sugar (a.k.a. powdered or confectioners sugar)
- A little vanilla, cocoa, spice or essence depending on the flavour of your cakes
- Approximately 1 1/3 cups of melted butter or firm margarine
- A little milk
- 2 x 375g bars of chocolate to coat the balls. I used 1 bar each of white and milk chocolate.
SUGGESTIONS:
- Turn a basic butter cake into something yummier with a dash of orange/lemon/lime juice (replacing some of the wet ingredients) OR a teaspoon each of cinnamon and ginger for a spicy kick OR half a teaspoon of orange or peppermint essence to a chocolate cake.
- After dipping, drizzling or coating your cake balls in chocolate, roll or sprinkle them with crushed nuts/sprinkles/shredded coconut etc. Try a small pinch of orange zest or edible glitter for fancy cake balls and crushed sweet biscuits or animal sprinkles for the kids.
For approximately 60-70 cake balls (depending of course on your choice of sizing) I made four packet cake mixes, two vanilla and two chocolate. I used the super cheap no-name brand but feel free to use your favourite mix or bake a cake from scratch. Let the cakes cool completely (use the fridge or freezer if you are in a hurry). Break the cakes into fine crumbs, I did that by hand but a food processor would have been fantastic. You do NOT want a sticky mud cake or something with chocolate chips, raisins or fruit for these cake bites. A fruity or chippy cake might be fine but I don't think the balls would stay together very well with chunks, and a mud cake will not crumble properly.
Then add about a cup of powdered (icing) sugar to each crumbled cake, a few tablespoons of cocoa to the choc ones and a teaspoon of vanilla to the vanilla ones. Or use your tastbuds to dictate the essences :D.
To bind, add about a third of a cup of melted butter and drizzle milk in until the balls stay together when squished. Add your wet ingredients slowly, you want to avoid gooey cake balls.
Then grab a small handful of mix and squeeze in your hand until in forms a ball. Most of ours were on the big side, lol. Pop them in the fridge for 10 minutes to harden a little and melt some chocolate while you wait. I got a 375g bag each of milk and white chocolate and that let us half-dip most of them with a few totally covered, so you may need quite a bit of chocolate to fully cover your cake balls. We dipped half the balls in chocolate and laid them down on a tray covered in baking paper and popped them in the fridge to set.
We wrapped each ball in a square of cellophane, twisted the top and secured with a little clear tape cause the buggers wouldn't stay closed. They were delicious and not too sweet like the recipes that call for a tin of premade frosting, although the recipe using cream cheese might be nice. Mine were not super soft, just soft enough to hold shape and they tasted just like the original yummy cake mix.
A banana cake or carrot cake would be delicious using cream cheese in place of the butter and milk.
Subscribe to:
Posts (Atom)