Today I'm going black to support the anti SPOA and PIPA movement.
Do you want your internet censored? Do you want your web page under scrutiny by the government? Do you want to risk being closed down because some big business thinks you are impinging on their copyright? Don't risk the amazing and free-spirited voice of the internet that has been creating and supporting individual voices for years.
Piracy is the worst type of theft, stealing other's hard-earned ideas and creations is the most despicable form of flattery. But these laws are not the way to protect us.

Showing posts with label Pattern. Show all posts
Showing posts with label Pattern. Show all posts
Thursday, January 19, 2012
Monday, January 25, 2010
Paper Waratah flower tutorial - Australia Day project
Happy Australia Day! Ok, well Australia Day is really tomorrow but I wanted this pattern to be available a little early. These tiny paper Waratah flowers are really easy to make and you can do the earring set in under an hour. Plus, you probably have all the materials on hand! How cool is that?
Also mentioned at Craftster.org...

Approximate time for 2 earrings: up to 1 hour
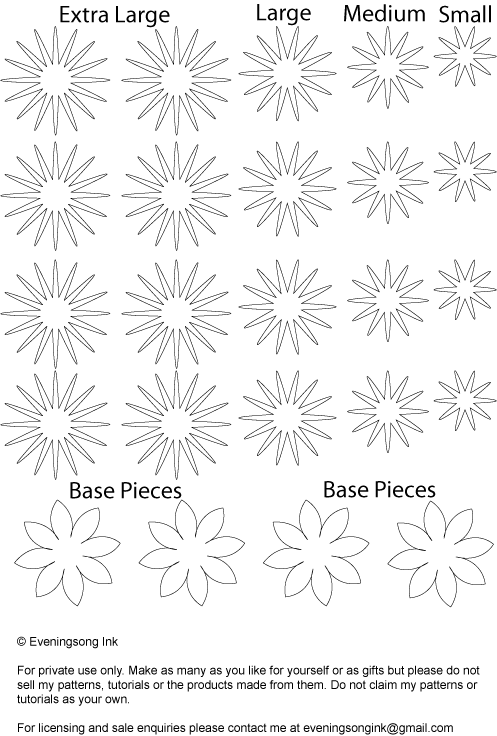
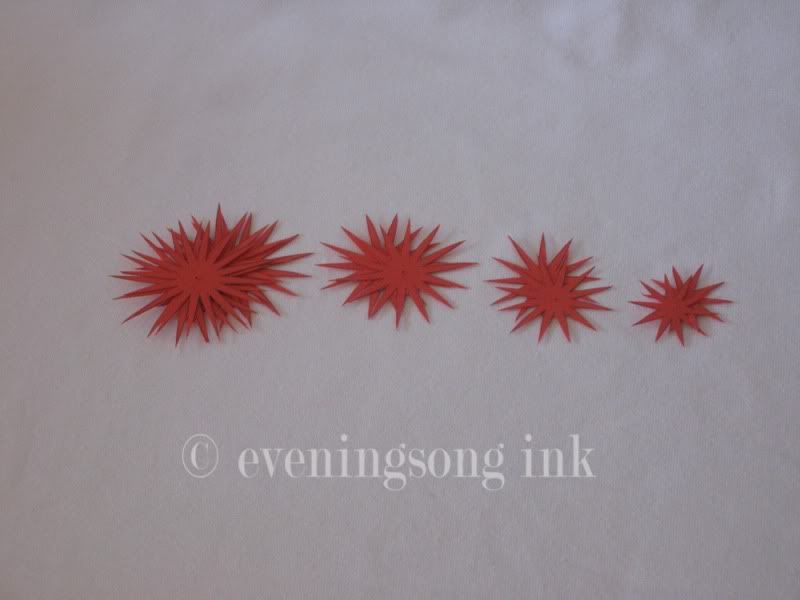 1. Cut out each piece and stack according to size. For each flower there will be 4 x extra large pieces, 2 x large pieces, 2 x medium pieces, 2 x small pieces and 2 x base pieces.
2. Pierce a small hole in the centre of each piece using a craft knife or thumbtack.
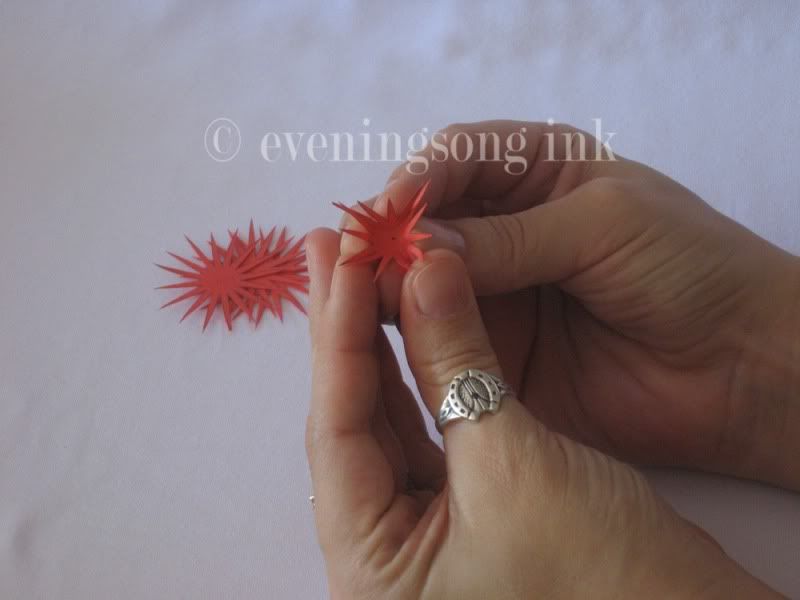 3. Fold the flower petals up into a soft cone.
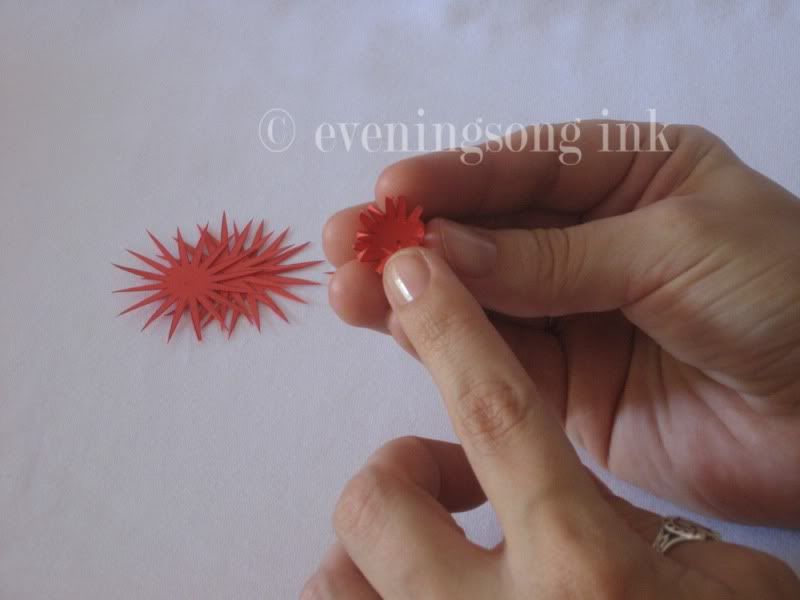 4. Gently curl the points towards the centre.
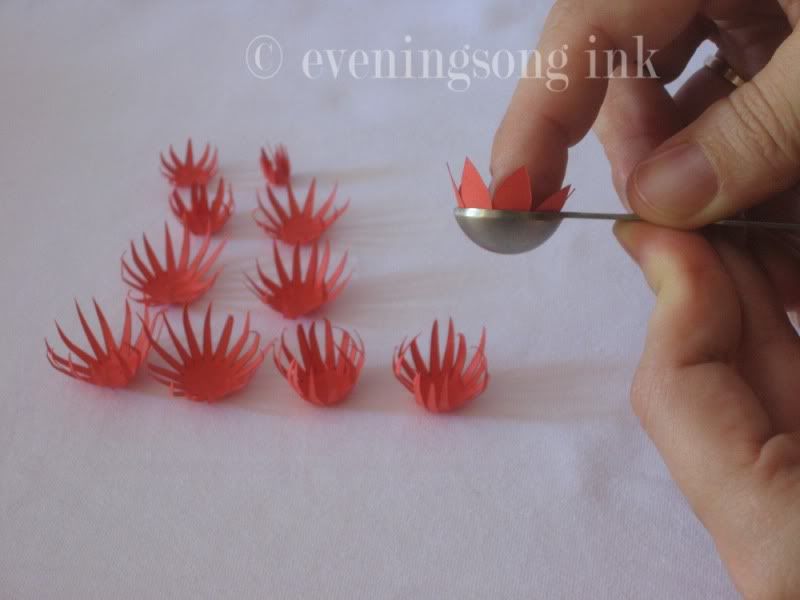
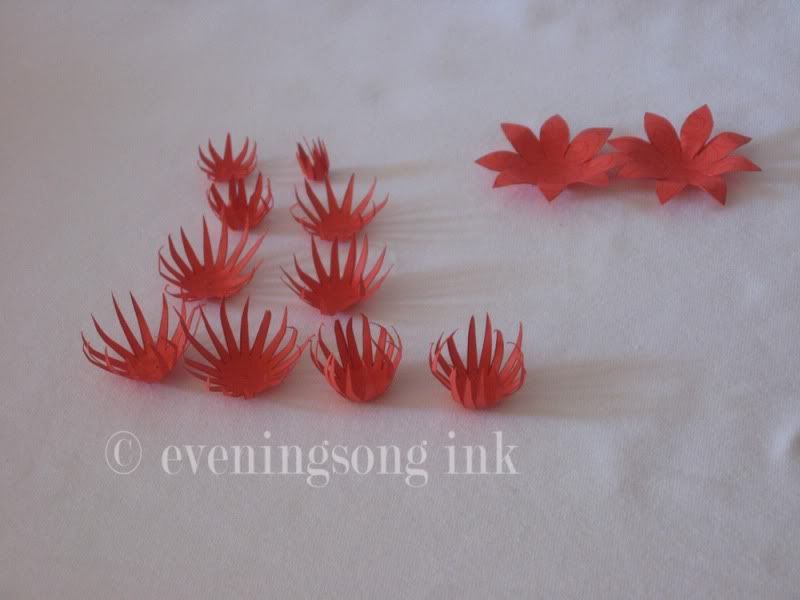
5. Mould the base pieces into shallow bowls and curl the petals back. I used a half-sphere measuring spoon for this but your fingers will do fine.
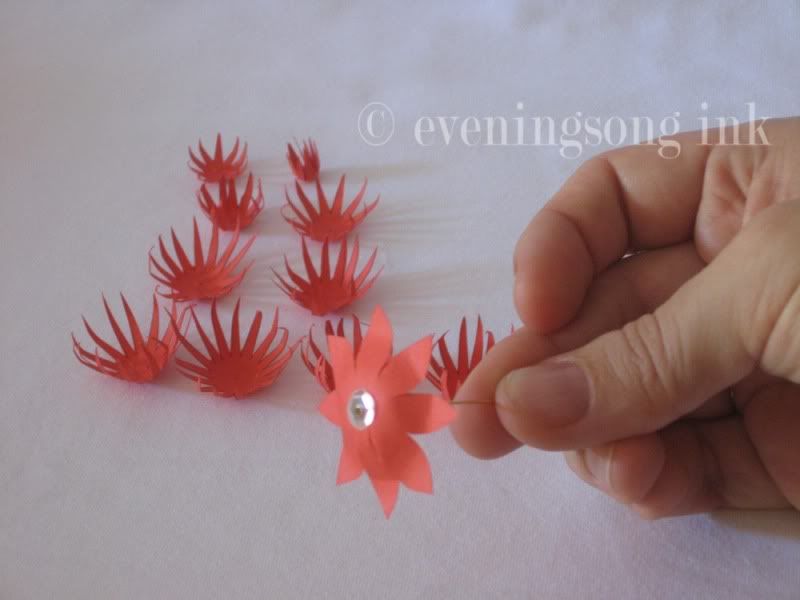 6. Thread a sequin onto the head pin. Add a base piece, followed by a seed bead.
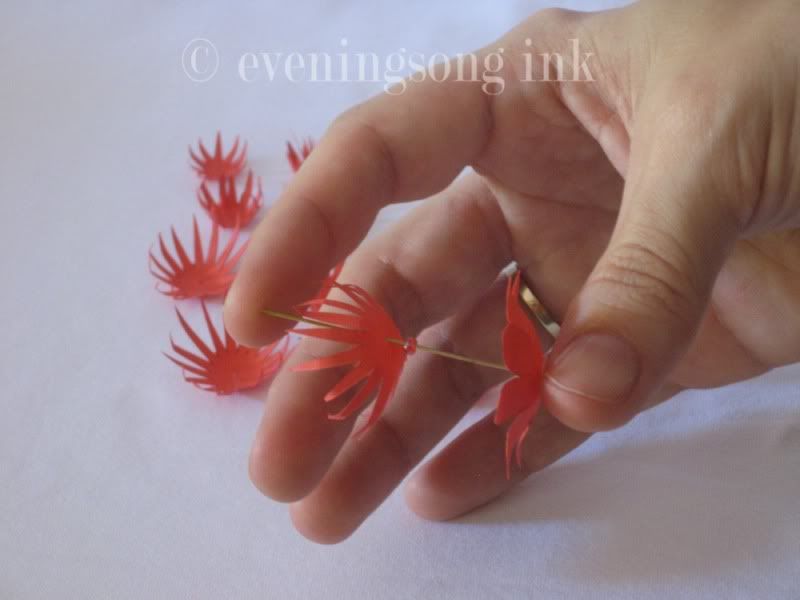
7. Add the next base piece followed by a seed bead.
8. Thread on one of the extra large petals, followed by a seed bead.
9. Repeat this process, progressing down through the petal sizes.
10. Thread the final small petal and follow with a seed bead.

 11. Push the flower gently to the base of the head pin. Grasp the petals, not the base pieces, and firmly mould the flower into a cone shape. Don't be shy here.
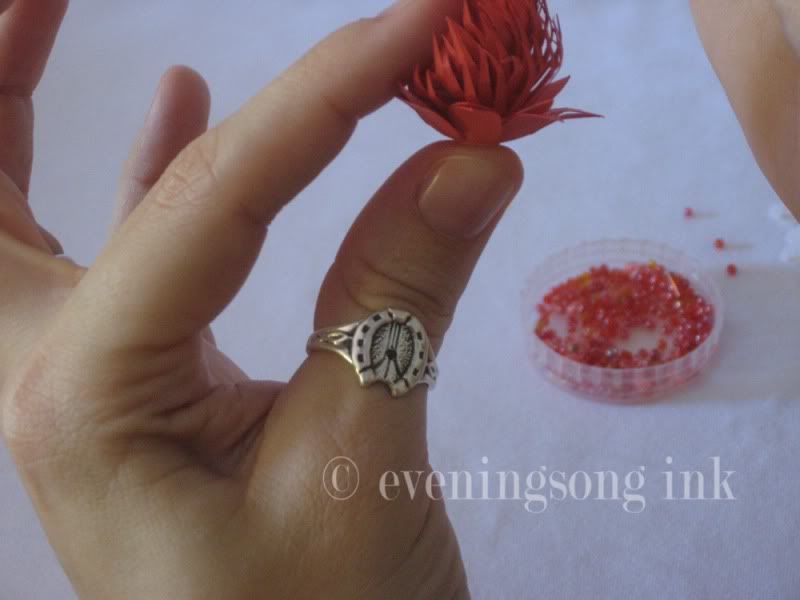 12. Using an index finger, hold against the side of the flower and press downwards. This flares the base a little and makes for a fat-bottomed flower. Repeat all around the flower until it is even.
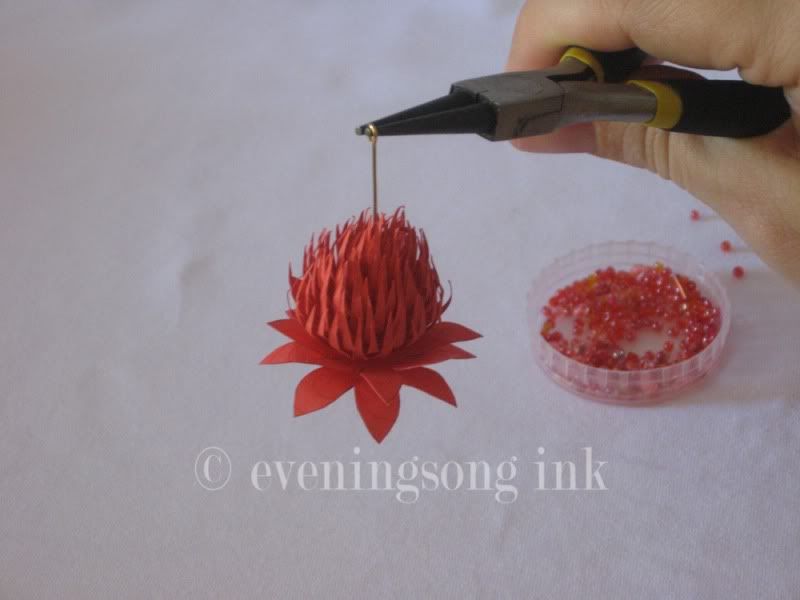 13. Use your pliers and make an eye in the headpin. Secure to your earring findings.


NOTE: You can also make a plain, upright flower. Thread the pieces from smallest to largest, followed by the base pieces. Secure with a crimp bead and give to a loved one.
If you make your own please let me know how they turn out!
Also, I do apologise for the copyrights on the pictures and the disclaimer on the pattern. I really do not mean to be rude or distrustful, but being the internet you never know when someone will swipe your tutorial and claim it as their own. This is purely to discourage unsavoury characters and to hopefully prevent others from profiting from my hard work without my permission.
Also mentioned at Craftster.org...

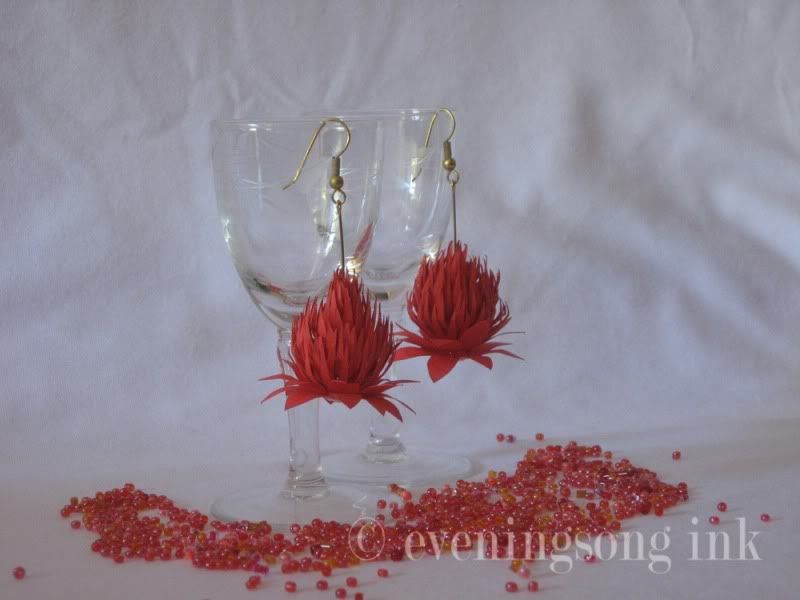
Approximate time for 2 earrings: up to 1 hour
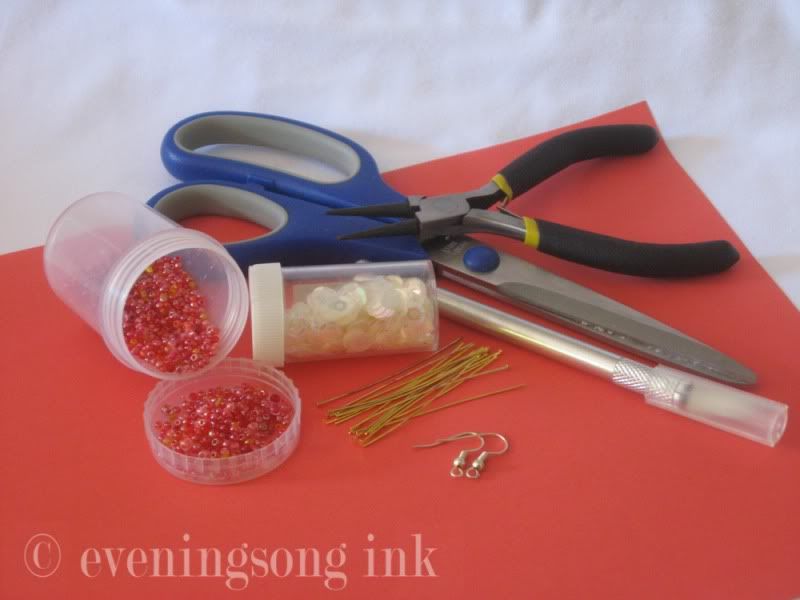
Materials:
- 1 piece of office paper in your chosen colour, or 1 piece of decorative scrapbook paper cut to size (I used a plain piece of red copy paper. Dress up plain paper with a stamp or draw some squiggles)
- 2 x 5cm (1 inch) head pins, any metal
- A pinch of seed beads to complement your paper colour ( I chose red)
- 2 x sequins, any colour you like (mine are pearl white)
- earring findings of your choice - these earrings can also be attached to plain sleepers instead of earring hooks or studs
Tools:
- craft knife, or scissors if you prefer
- round nosed pliers to close the loops
- desktop printer
2. Pierce a small hole in the centre of each piece using a craft knife or thumbtack.
5. Mould the base pieces into shallow bowls and curl the petals back. I used a half-sphere measuring spoon for this but your fingers will do fine.
7. Add the next base piece followed by a seed bead.
8. Thread on one of the extra large petals, followed by a seed bead.
9. Repeat this process, progressing down through the petal sizes.
10. Thread the final small petal and follow with a seed bead.
NOTE: You can also make a plain, upright flower. Thread the pieces from smallest to largest, followed by the base pieces. Secure with a crimp bead and give to a loved one.
If you make your own please let me know how they turn out!
Also, I do apologise for the copyrights on the pictures and the disclaimer on the pattern. I really do not mean to be rude or distrustful, but being the internet you never know when someone will swipe your tutorial and claim it as their own. This is purely to discourage unsavoury characters and to hopefully prevent others from profiting from my hard work without my permission.
Wednesday, December 30, 2009
Front lace-up crochet knee socks - tutorial
I participated in a craft swap where my partner had wisted a pair of lace-up knee socks. The design was very basic and I had seen many variations around but none that had proper heel shaping or a comfy toe. I made up this pattern as I went along - with much trial and error - and am really pleased with the result.
Bear in mind I am not a professional crochet artist nor am I very experienced in writing patterns for others. What makes sense to me may not make sense to someone else so let me know if you have any queries.

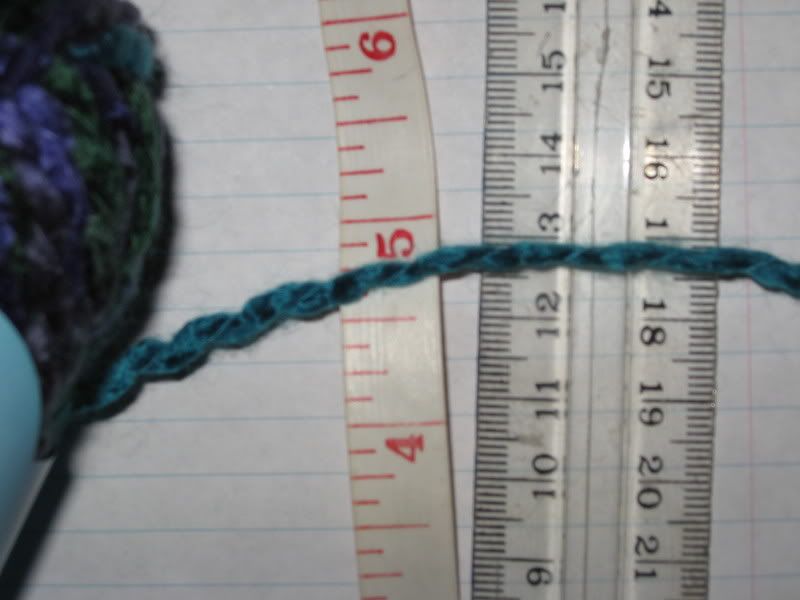
This is the yarn I used, a basic yarn from a discount store. I have idea what to call it but I hope it helps :P
the cuff says:
10x10cm = 18 rows and 13 stitches. 7mm/2 UK needles
Crochet pattern – intermediate
Yarn – open to suggestion, the first row you crochet goes from the top of the sock to just before the toes so add or subtract stitches accordingly
Starting on one side of the laces

1. ch 59. sc in 1st st from hook. Sc to end, ch 1 and turn
2. repeat (1.) for another 7 rows
Heel shaping, side 1
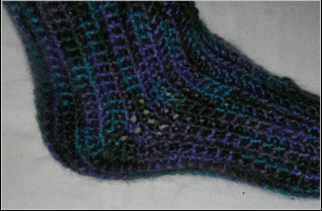
3. sc in the next 16 sts. 2 sc in the next st. sc to end, ch 1 and turn
4. sc in the next 41 sts. 2 sc in each of the next 2 sts, 16 sc to end. Ch 1 and turn
5. sc in the next 16 sts. 2 sc in each of the next 4 sts, 41 sc to end. Ch 1 and turn
6. sc in the next 43 sts. 2 sc in each of the next 4 sts, 18 sc to end. Ch 1 and turn
7. sc to end, ch 1 and turn
8. repeat (7.) for another 4 rows
Calf shaping
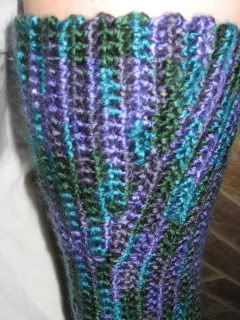
9. sc in the next 5 sts. 1 sl st, ch 1 and turn. 5 sc to end, ch 1 and turn
10. sc in the next 10 sts. 1 sl st, ch 1 and turn. 10 sc to end, ch 1 and turn
11. sc in the next 15 sts. 1 sl st, ch 1 and turn. 15 sc to end, ch 1 and turn
12. sc in the next 20 sts. 1 sl st, ch 1 and turn. 20 sc to end, ch 1 and turn
13. (should be 69) sc to end, ch 1 and turn
14. sc to end, ch 1 and turn
15. sc in the next 20 sts. 1 sl st, ch 1 and turn. 20 sc to end, ch 1 and turn
16. sc in the next 15 sts. 1 sl st, ch 1 and turn. 15 sc to end, ch 1 and turn
17. sc in the next 10 sts. 1 sl st, ch 1 and turn. 10 sc to end, ch 1 and turn
18. sc in the next 5 sts. 1 sl st, ch 1 and turn. 5 sc to end, ch 1 and turn
19. sc to end, ch 1 and turn
20. repeat (19.) for another 4 rows
Heel shaping, side 2
21. sc in the next 18 sts. St 2 tog to decrease (repeat another 3 times). 43 sc to end, ch 1 and turn
22. sc in the next 41 sts. St 2 tog to decrease (repeat another 3 times). 16 sc to end, ch 1 and turn
23. sc in the next 16 sts. St 2 tog to decrease (repeat another 3 times). 41 sc to end, ch 1 and turn
24. sc in the next 41 sts. St 2 tog to decrease (repeat another 3 times). 16 sc to end, ch 1 and turn
25. sc to end, ch 1 and turn
26. repeat (25.) for another 7 rows
27. finish off
Toe
 ^pointing to the sides
Step 1
The toe is kind of improvised, so bear with me
1. hold the two sides of the sock together and slip stitch to join them
2. sc all the way around the edge and join to the beginning of the row
3. sc to to the side, decrease by crocheting 2 stitches together (repeat) and sc across the back and decrease again on the other side
4. sc to the centre and join
5. repeat (2. & 3.) until the toe is a comfortable length, and stitch the remaining opening closed
Tips
- For a wider gap between the laces (to show off lacing better) do fewer rows at 26. & 2.
- For smaller calves, skip steps 9. & 18.
- For longer or shorter socks, chain more or less at 1.– this will throw out the pattern slightly, but use your imagination ;P
- This size will fit a few different sized feet, the crochet stretches quite well so once you have sorted out the correct yarn, the pattern will fit most ladies’ adult feet
- Any hole will be suitable for the laces. To make more of a feature of them, choose holes about an inch or so in from the edge of the sock
- One side of the lacing will look a bit longer than the other, but will have the same amount of stitches. This is because one side began as a chain. Just tug the sides a little and lace them up and they will become even.
- Have fun and try some fancy stitching too. Some lace work on the top would be great and even trying to put the lacing on the back would be cool too.
- Normal disclaimer: Please do not use my tutorial without my permission or copy my design style for profit. Make as many of these socks for yourself and friends but please do not make them to sell or sell the tutorial. You know, crafty karma and all that.
Bear in mind I am not a professional crochet artist nor am I very experienced in writing patterns for others. What makes sense to me may not make sense to someone else so let me know if you have any queries.


This is the yarn I used, a basic yarn from a discount store. I have idea what to call it but I hope it helps :P
the cuff says:
10x10cm = 18 rows and 13 stitches. 7mm/2 UK needles
Crochet pattern – intermediate
Yarn – open to suggestion, the first row you crochet goes from the top of the sock to just before the toes so add or subtract stitches accordingly
Starting on one side of the laces
1. ch 59. sc in 1st st from hook. Sc to end, ch 1 and turn
2. repeat (1.) for another 7 rows
Heel shaping, side 1
3. sc in the next 16 sts. 2 sc in the next st. sc to end, ch 1 and turn
4. sc in the next 41 sts. 2 sc in each of the next 2 sts, 16 sc to end. Ch 1 and turn
5. sc in the next 16 sts. 2 sc in each of the next 4 sts, 41 sc to end. Ch 1 and turn
6. sc in the next 43 sts. 2 sc in each of the next 4 sts, 18 sc to end. Ch 1 and turn
7. sc to end, ch 1 and turn
8. repeat (7.) for another 4 rows
Calf shaping
9. sc in the next 5 sts. 1 sl st, ch 1 and turn. 5 sc to end, ch 1 and turn
10. sc in the next 10 sts. 1 sl st, ch 1 and turn. 10 sc to end, ch 1 and turn
11. sc in the next 15 sts. 1 sl st, ch 1 and turn. 15 sc to end, ch 1 and turn
12. sc in the next 20 sts. 1 sl st, ch 1 and turn. 20 sc to end, ch 1 and turn
13. (should be 69) sc to end, ch 1 and turn
14. sc to end, ch 1 and turn
15. sc in the next 20 sts. 1 sl st, ch 1 and turn. 20 sc to end, ch 1 and turn
16. sc in the next 15 sts. 1 sl st, ch 1 and turn. 15 sc to end, ch 1 and turn
17. sc in the next 10 sts. 1 sl st, ch 1 and turn. 10 sc to end, ch 1 and turn
18. sc in the next 5 sts. 1 sl st, ch 1 and turn. 5 sc to end, ch 1 and turn
19. sc to end, ch 1 and turn
20. repeat (19.) for another 4 rows
Heel shaping, side 2
21. sc in the next 18 sts. St 2 tog to decrease (repeat another 3 times). 43 sc to end, ch 1 and turn
22. sc in the next 41 sts. St 2 tog to decrease (repeat another 3 times). 16 sc to end, ch 1 and turn
23. sc in the next 16 sts. St 2 tog to decrease (repeat another 3 times). 41 sc to end, ch 1 and turn
24. sc in the next 41 sts. St 2 tog to decrease (repeat another 3 times). 16 sc to end, ch 1 and turn
25. sc to end, ch 1 and turn
26. repeat (25.) for another 7 rows
27. finish off
Toe
Step 1
The toe is kind of improvised, so bear with me
1. hold the two sides of the sock together and slip stitch to join them
2. sc all the way around the edge and join to the beginning of the row
3. sc to to the side, decrease by crocheting 2 stitches together (repeat) and sc across the back and decrease again on the other side
4. sc to the centre and join
5. repeat (2. & 3.) until the toe is a comfortable length, and stitch the remaining opening closed
Tips
- For a wider gap between the laces (to show off lacing better) do fewer rows at 26. & 2.
- For smaller calves, skip steps 9. & 18.
- For longer or shorter socks, chain more or less at 1.– this will throw out the pattern slightly, but use your imagination ;P
- This size will fit a few different sized feet, the crochet stretches quite well so once you have sorted out the correct yarn, the pattern will fit most ladies’ adult feet
- Any hole will be suitable for the laces. To make more of a feature of them, choose holes about an inch or so in from the edge of the sock
- One side of the lacing will look a bit longer than the other, but will have the same amount of stitches. This is because one side began as a chain. Just tug the sides a little and lace them up and they will become even.
- Have fun and try some fancy stitching too. Some lace work on the top would be great and even trying to put the lacing on the back would be cool too.
- Normal disclaimer: Please do not use my tutorial without my permission or copy my design style for profit. Make as many of these socks for yourself and friends but please do not make them to sell or sell the tutorial. You know, crafty karma and all that.
Subscribe to:
Posts (Atom)