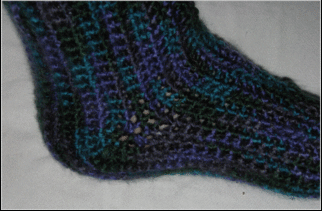
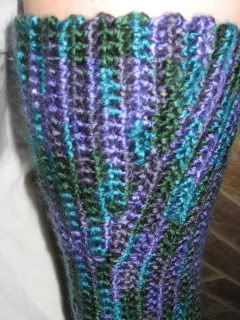
I participated in a craft swap where my partner had wisted a pair of lace-up knee socks. The design was very basic and I had seen many variations around but none that had proper heel shaping or a comfy toe. I made up this pattern as I went along - with much trial and error - and am really pleased with the result.
Bear in mind I am not a professional crochet artist nor am I very experienced in writing patterns for others. What makes sense to me may not make sense to someone else so let me know if you have any queries.
This is the yarn I used, a basic yarn from a discount store. I have idea what to call it but I hope it helps :P
the cuff says:
10x10cm = 18 rows and 13 stitches. 7mm/2 UK needles
Crochet pattern – intermediate
Yarn – open to suggestion, the first row you crochet goes from the top of the sock to just before the toes so add or subtract stitches accordingly
Starting on one side of the laces
1. ch 59. sc in 1st st from hook. Sc to end, ch 1 and turn
2. repeat (1.) for another 7 rows
Heel shaping, side 1
3. sc in the next 16 sts. 2 sc in the next st. sc to end, ch 1 and turn
4. sc in the next 41 sts. 2 sc in each of the next 2 sts, 16 sc to end. Ch 1 and turn
5. sc in the next 16 sts. 2 sc in each of the next 4 sts, 41 sc to end. Ch 1 and turn
6. sc in the next 43 sts. 2 sc in each of the next 4 sts, 18 sc to end. Ch 1 and turn
7. sc to end, ch 1 and turn
8. repeat (7.) for another 4 rows
Calf shaping
9. sc in the next 5 sts. 1 sl st, ch 1 and turn. 5 sc to end, ch 1 and turn
10. sc in the next 10 sts. 1 sl st, ch 1 and turn. 10 sc to end, ch 1 and turn
11. sc in the next 15 sts. 1 sl st, ch 1 and turn. 15 sc to end, ch 1 and turn
12. sc in the next 20 sts. 1 sl st, ch 1 and turn. 20 sc to end, ch 1 and turn
13. (should be 69) sc to end, ch 1 and turn
14. sc to end, ch 1 and turn
15. sc in the next 20 sts. 1 sl st, ch 1 and turn. 20 sc to end, ch 1 and turn
16. sc in the next 15 sts. 1 sl st, ch 1 and turn. 15 sc to end, ch 1 and turn
17. sc in the next 10 sts. 1 sl st, ch 1 and turn. 10 sc to end, ch 1 and turn
18. sc in the next 5 sts. 1 sl st, ch 1 and turn. 5 sc to end, ch 1 and turn
19. sc to end, ch 1 and turn
20. repeat (19.) for another 4 rows
Heel shaping, side 2
21. sc in the next 18 sts. St 2 tog to decrease (repeat another 3 times). 43 sc to end, ch 1 and turn
22. sc in the next 41 sts. St 2 tog to decrease (repeat another 3 times). 16 sc to end, ch 1 and turn
23. sc in the next 16 sts. St 2 tog to decrease (repeat another 3 times). 41 sc to end, ch 1 and turn
24. sc in the next 41 sts. St 2 tog to decrease (repeat another 3 times). 16 sc to end, ch 1 and turn
25. sc to end, ch 1 and turn
26. repeat (25.) for another 7 rows
27. finish off
Toe
^pointing to the sides
Step 1
The toe is kind of improvised, so bear with me
1. hold the two sides of the sock together and slip stitch to join them
2. sc all the way around the edge and join to the beginning of the row
3. sc to to the side, decrease by crocheting 2 stitches together (repeat) and sc across the back and decrease again on the other side
4. sc to the centre and join
5. repeat (2. & 3.) until the toe is a comfortable length, and stitch the remaining opening closed
Tips
- For a wider gap between the laces (to show off lacing better) do fewer rows at 26. & 2.
- For smaller calves, skip steps 9. & 18.
- For longer or shorter socks, chain more or less at 1.– this will throw out the pattern slightly, but use your imagination ;P
- This size will fit a few different sized feet, the crochet stretches quite well so once you have sorted out the correct yarn, the pattern will fit most ladies’ adult feet
- Any hole will be suitable for the laces. To make more of a feature of them, choose holes about an inch or so in from the edge of the sock
- One side of the lacing will look a bit longer than the other, but will have the same amount of stitches. This is because one side began as a chain. Just tug the sides a little and lace them up and they will become even.
- Have fun and try some fancy stitching too. Some lace work on the top would be great and even trying to put the lacing on the back would be cool too.
- Normal disclaimer: Please do not use my tutorial without my permission or copy my design style for profit. Make as many of these socks for yourself and friends but please do not make them to sell or sell the tutorial. You know, crafty karma and all that.
Wednesday, December 30, 2009
Tuesday, December 29, 2009
Paper favour bags - Tutorial
I wanted to share these favour bags I made for my wedding in September 2007, I am so thrilled at how they turned out.
Made of regular A4 computer paper printed with a Photoshop brush and glued into shape. The tags are also created in Photoshop and the 'love' beads are rolled paper beads with the word printed on. All tied up with a piece of variegated purple cotton crochet yarn they looked pretty good. I popped in 4 large choc coated cake balls wrapped in purple cellophane and they held up really well.
I had a few of these to make so I made myself a sturdy little cardboard box frame out of an old chocolate box. Mine is 9cm wide x 18 cm high x 5.5 cm deep and it makes a nice wide little rectangular bag.
Print up your page and lay it right side down and pop your box on top. Note the thin black line at the top of the box? That's to line up the top of the paper so all the bottoms are the same and the bags are the same height. Crease the edges well.
Run a line of glue down the right side of the paper. Or use a glue stick but remember the paper only overlaps a few millimetres.
Fold the paper over and press to adhere the glue. Then align the paper to the line at the top.
It takes a little while for white glue to dry but glue sticks are nearly immediate. I made a few up to this point, pulled it off the box and moved on to the next while the glue dried. It can be tricky getting the paper to slide back on the box though when the glue has dried.
Tip the box on it's end and fold in the bottome like you would wrap a gift. Crease the paper well and add a few dobs of glue in the corners.
Fold the flaps over and secure with a little tape. Remove from the box frame
Cinch the sides and you're done!
If you are making a few you might like to fold them up for easy storage. Lay the bag down and continue to fold the sides.
Keep the sides folded in and press the bottom towards the back of the bag so there is no crease on your nice printed front.
Ta DA!
I bet these would make great gifts bags for Christmas gifts, and a nice way to present assenbly-line gifts too. Have fun!
Normal disclaimer: although the paper bags are obviously a universal design, please do not use my tutorial without my permission or copy my design style for profit. You know, crafty karma and all that.
Monday, December 28, 2009
Cake balls (truffles)
Ingredients:
SUGGESTIONS:
For approximately 60-70 cake balls (depending of course on your choice of sizing) I made four packet cake mixes, two vanilla and two chocolate. I used the super cheap no-name brand but feel free to use your favourite mix or bake a cake from scratch. Let the cakes cool completely (use the fridge or freezer if you are in a hurry). Break the cakes into fine crumbs, I did that by hand but a food processor would have been fantastic. You do NOT want a sticky mud cake or something with chocolate chips, raisins or fruit for these cake bites. A fruity or chippy cake might be fine but I don't think the balls would stay together very well with chunks, and a mud cake will not crumble properly.
Then add about a cup of powdered (icing) sugar to each crumbled cake, a few tablespoons of cocoa to the choc ones and a teaspoon of vanilla to the vanilla ones. Or use your tastbuds to dictate the essences :D.
To bind, add about a third of a cup of melted butter and drizzle milk in until the balls stay together when squished. Add your wet ingredients slowly, you want to avoid gooey cake balls.
Then grab a small handful of mix and squeeze in your hand until in forms a ball. Most of ours were on the big side, lol. Pop them in the fridge for 10 minutes to harden a little and melt some chocolate while you wait. I got a 375g bag each of milk and white chocolate and that let us half-dip most of them with a few totally covered, so you may need quite a bit of chocolate to fully cover your cake balls. We dipped half the balls in chocolate and laid them down on a tray covered in baking paper and popped them in the fridge to set.
We wrapped each ball in a square of cellophane, twisted the top and secured with a little clear tape cause the buggers wouldn't stay closed. They were delicious and not too sweet like the recipes that call for a tin of premade frosting, although the recipe using cream cheese might be nice. Mine were not super soft, just soft enough to hold shape and they tasted just like the original yummy cake mix.
A banana cake or carrot cake would be delicious using cream cheese in place of the butter and milk.
- Four packet cake mixes, made according to the instructions OR four medium-sized cakes of your choice made from scratch
- Four cups of icing sugar (a.k.a. powdered or confectioners sugar)
- A little vanilla, cocoa, spice or essence depending on the flavour of your cakes
- Approximately 1 1/3 cups of melted butter or firm margarine
- A little milk
- 2 x 375g bars of chocolate to coat the balls. I used 1 bar each of white and milk chocolate.
SUGGESTIONS:
- Turn a basic butter cake into something yummier with a dash of orange/lemon/lime juice (replacing some of the wet ingredients) OR a teaspoon each of cinnamon and ginger for a spicy kick OR half a teaspoon of orange or peppermint essence to a chocolate cake.
- After dipping, drizzling or coating your cake balls in chocolate, roll or sprinkle them with crushed nuts/sprinkles/shredded coconut etc. Try a small pinch of orange zest or edible glitter for fancy cake balls and crushed sweet biscuits or animal sprinkles for the kids.
For approximately 60-70 cake balls (depending of course on your choice of sizing) I made four packet cake mixes, two vanilla and two chocolate. I used the super cheap no-name brand but feel free to use your favourite mix or bake a cake from scratch. Let the cakes cool completely (use the fridge or freezer if you are in a hurry). Break the cakes into fine crumbs, I did that by hand but a food processor would have been fantastic. You do NOT want a sticky mud cake or something with chocolate chips, raisins or fruit for these cake bites. A fruity or chippy cake might be fine but I don't think the balls would stay together very well with chunks, and a mud cake will not crumble properly.
Then add about a cup of powdered (icing) sugar to each crumbled cake, a few tablespoons of cocoa to the choc ones and a teaspoon of vanilla to the vanilla ones. Or use your tastbuds to dictate the essences :D.
To bind, add about a third of a cup of melted butter and drizzle milk in until the balls stay together when squished. Add your wet ingredients slowly, you want to avoid gooey cake balls.
Then grab a small handful of mix and squeeze in your hand until in forms a ball. Most of ours were on the big side, lol. Pop them in the fridge for 10 minutes to harden a little and melt some chocolate while you wait. I got a 375g bag each of milk and white chocolate and that let us half-dip most of them with a few totally covered, so you may need quite a bit of chocolate to fully cover your cake balls. We dipped half the balls in chocolate and laid them down on a tray covered in baking paper and popped them in the fridge to set.
We wrapped each ball in a square of cellophane, twisted the top and secured with a little clear tape cause the buggers wouldn't stay closed. They were delicious and not too sweet like the recipes that call for a tin of premade frosting, although the recipe using cream cheese might be nice. Mine were not super soft, just soft enough to hold shape and they tasted just like the original yummy cake mix.
A banana cake or carrot cake would be delicious using cream cheese in place of the butter and milk.
Sunday, December 20, 2009
Sculpted voidwalker gift for brother
Hi All
Here was my last-minute crafted gift for my brother. A fellow World of Warcraft player, he has an 80 Paladin, Rogue and Warlock. So close to Christmas there was noooo way I was attempting to sculpt one of his toons so I went for a Warlock pet instead.
"A voidwalker!" I think to myself, "that should be easy". Famous last words...
Sadly my local craft stores only stock Sculpey III. Seriously inept for proper sculpting but I am rather used to it by now.
So, meet my voidwalker. Foil, wire and bamboo armature with Sculpey III and acrylic highlights. Yes, the clay was blue/purple, I just gave him depth with acrylics.
Base is clay and cotton wool painted with acrylics and permanent marker.
Tag is a Photoshop creation.
He resides in a recycled glass jam jar, he does need the occasional breather but only with proper supervision since the cheeky buggers have a knack for disappearing into the shadows.
Tuesday, December 1, 2009
Miniature fairy sculpture
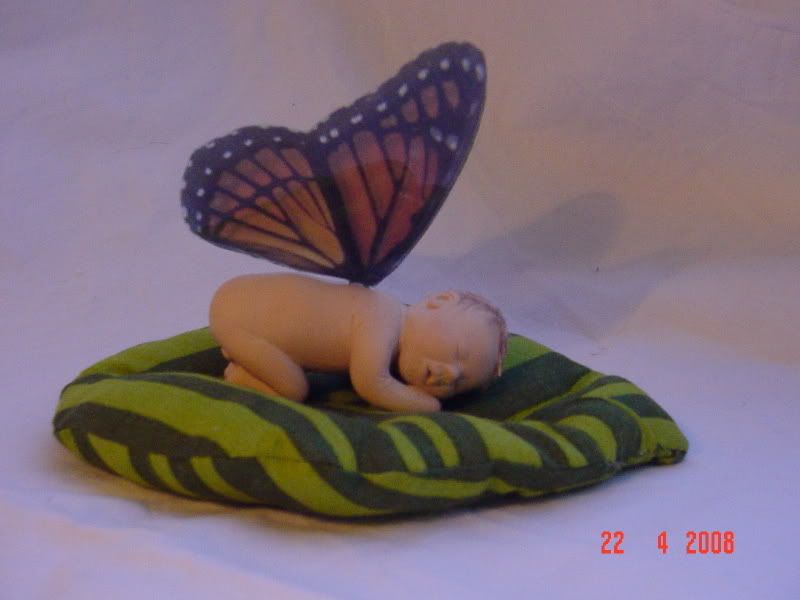
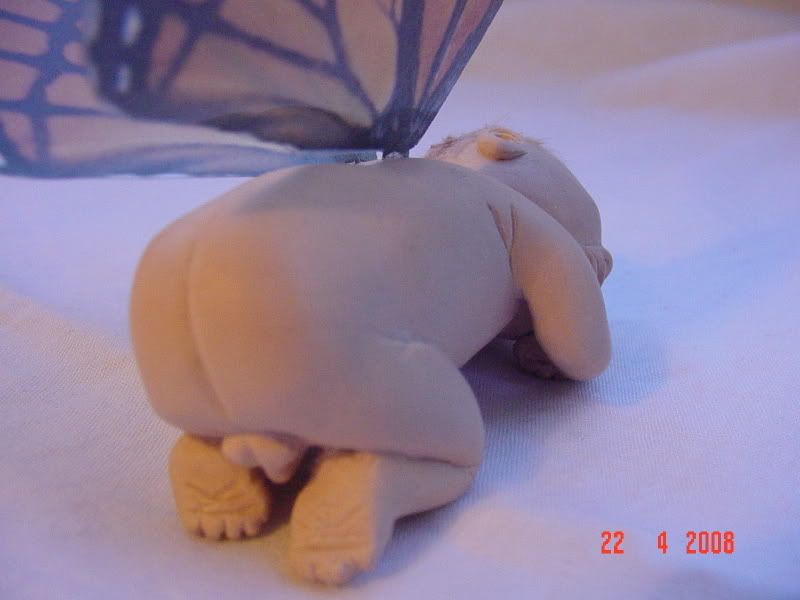
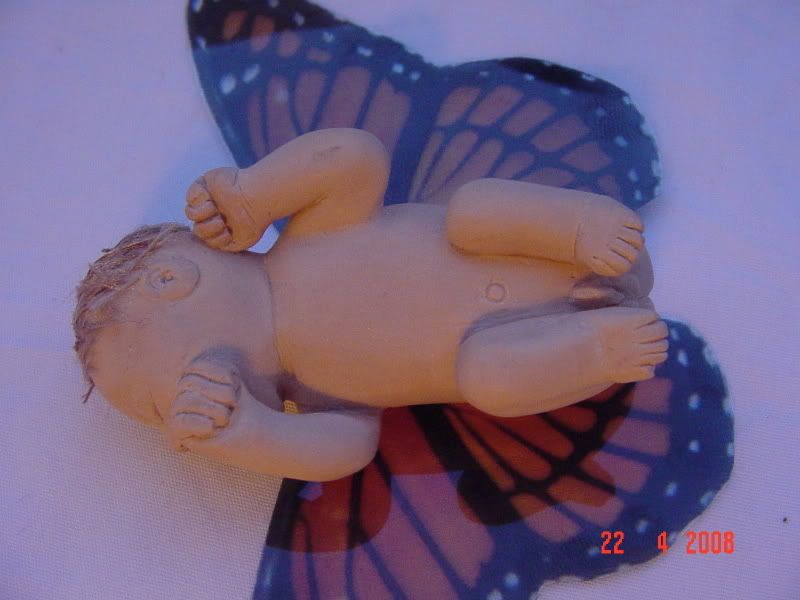
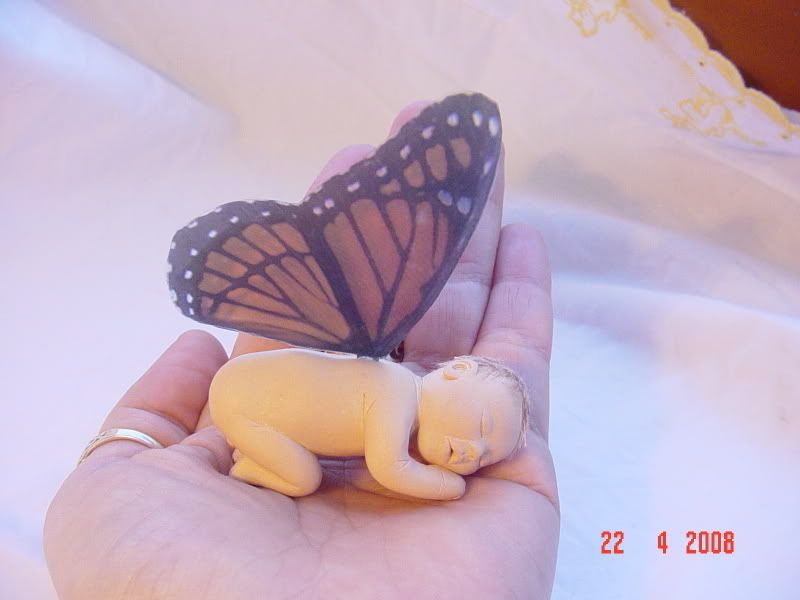
This little guy was a gift to a new friend back in 2008. He is the first life-like sculpture I have ever made and I completely fluked it :D. He is good old Sculpey III, a mix of beige, translucent and gold micak. It went ok but the Sculpey is quite stickey after working it for a while so I half-baked him, sanded and scraped him, then re-fired and sanded some more. I probably made him all wrong to proper sculptors, but he came together in the end.
Yes, this is a boy and yes, he does have boy bits so please do not keep reading if you are offended!
He is quite tiny and lies on his little padded leaf. And he is sealed only with a buffing of furniture wax. His wings are acetate photocopies cut to size and glued in after baking - I can certainly improve the finish next time I think. His hair is flutter yarn scraps attached with white glue.
In all honesty a lot of dolls freak me out and I have never been one of those people who collects figurines, but he just had to be made. I learned later that he had to go to one Craftster in particular which was a little awkward since I didn't actually know her and had to start my message with 'please don't think this is too weird, but I have something for you...'. But it all worked out and now he is living with his new mummy and daddy.
Of course, being an artist that doesn't really collect figurines I have more ideas in my head begging to be made reality. Perhaps it's a matter of these little guys want to be born and I am their outlet, if you follow my thinking...
If I do make more, I think they will all be asleep. Staring vacant eyes creep me out.
Subscribe to:
Comments (Atom)


