Today I'm going black to support the anti SPOA and PIPA movement.
Do you want your internet censored? Do you want your web page under scrutiny by the government? Do you want to risk being closed down because some big business thinks you are impinging on their copyright? Don't risk the amazing and free-spirited voice of the internet that has been creating and supporting individual voices for years.
Piracy is the worst type of theft, stealing other's hard-earned ideas and creations is the most despicable form of flattery. But these laws are not the way to protect us.

Showing posts with label Gardening. Show all posts
Showing posts with label Gardening. Show all posts
Thursday, January 19, 2012
Friday, December 2, 2011
Recycled plant pots - the perfect gift or decoration :) Tutorial!
Yet another recycled gift to add to your Christmas crafting is the Recycled Plant Pot. Seriously, if you grow these suckers from seed you'll spend about $2.00 for as many gifts as you like. Of course, don't be surprised if you end up keeping these little beauties for yourself!
Not only are these inexpensive but they are a real gift from the heart. Also, they don't collect dust, need batteries, make noise or need maintenance (apart from a little water now and then ;D)

Materials:


Not only are these inexpensive but they are a real gift from the heart. Also, they don't collect dust, need batteries, make noise or need maintenance (apart from a little water now and then ;D)


Mine are filled with delicious strawberries :) I can move the pots to the best position, they drain well and the fruits will tumble down the side without rotting
Materials:
- Clean, empty tins or plastic drink bottles (mine are baby formula containers and 3L juice bottles)
- Garden wire
- Spray primer
- Paint (I used sample pots of wall paint)
- Paintbrush
- Drill
- Craft knife
- Sandpaper
- Potting mix/garden soil/compost
- Seedlings
- Turn your containers upside down and drill some drainage holes in the bottoms
- Bottle planters - cut out a hole for the plant to go into (towards the top of the bottle), it needs to be just big enough to squish in the root ball of the plant. If needed, sand the holes to remove sharp bits
- Can planters - drill two holes at the top of the can opposite each other to thread a hanging wire through. Sand the holes lightly to keep sharp bits at bay
- Roughly sand your containers to give the paint something to stick to. It's important to note that the shiny paint finish on formula containers will repel the paint if not sanded. It doesn't have to be perfect, just rough up the paint or plastic a bit
- Prime your containers with the spray primer. Allow to dry (it won't take long!)
- Paint your containers and decorate as you wish. You will need a couple of coats for good coverage. Allow to dry well
- Snip and attach a length of garden wire to use as a hanging loop. The length will depend on whether you wish to hang your pots from a fence, tree branch or ceiling hook)
- Bottle planters - lay your bottle down and fill with soil through the cutout. Scoop out just enough soil to fit the root ball of your seedling and carefully but firmly pack the plant in. You can keep the bottle laying down for a couple of weeks until the plant is established but I carefully propped mine up immediately
- Can planters - fill with soil, leaving enough space to put your plant. Carefully pack in the roots of the plant and top up with a little more soil
- Give them a drink and put them in a suitable spot to get established until it's time to give them away!
- Raise your own seedlings from seed and this project may well only cost you a couple of dollars
- To give as gifts, choose a pretty annual flower. That way, at the end of the growing season your recipient can either re-plant or recycle their pot. No waste and no clutter! Perfect for the person who has everything
- If you want a no-hassle gift plant your pots with succulents
- For a kitchen goddess (or god ;P) plant your pots with herbs
- For kids, plant a yummy treat like strawberries. My strawberries adore these pots since they like good drainage and if you add a hanging wire the strawberries will tumble down without rotting!

Bottle planter materials

Can planter materials

Drill drainage holes and cut out plant hole

Drill drainage holes and hanger holes

Prime and allow to dry. Paint in chosen colours

Hang them up and let them get established
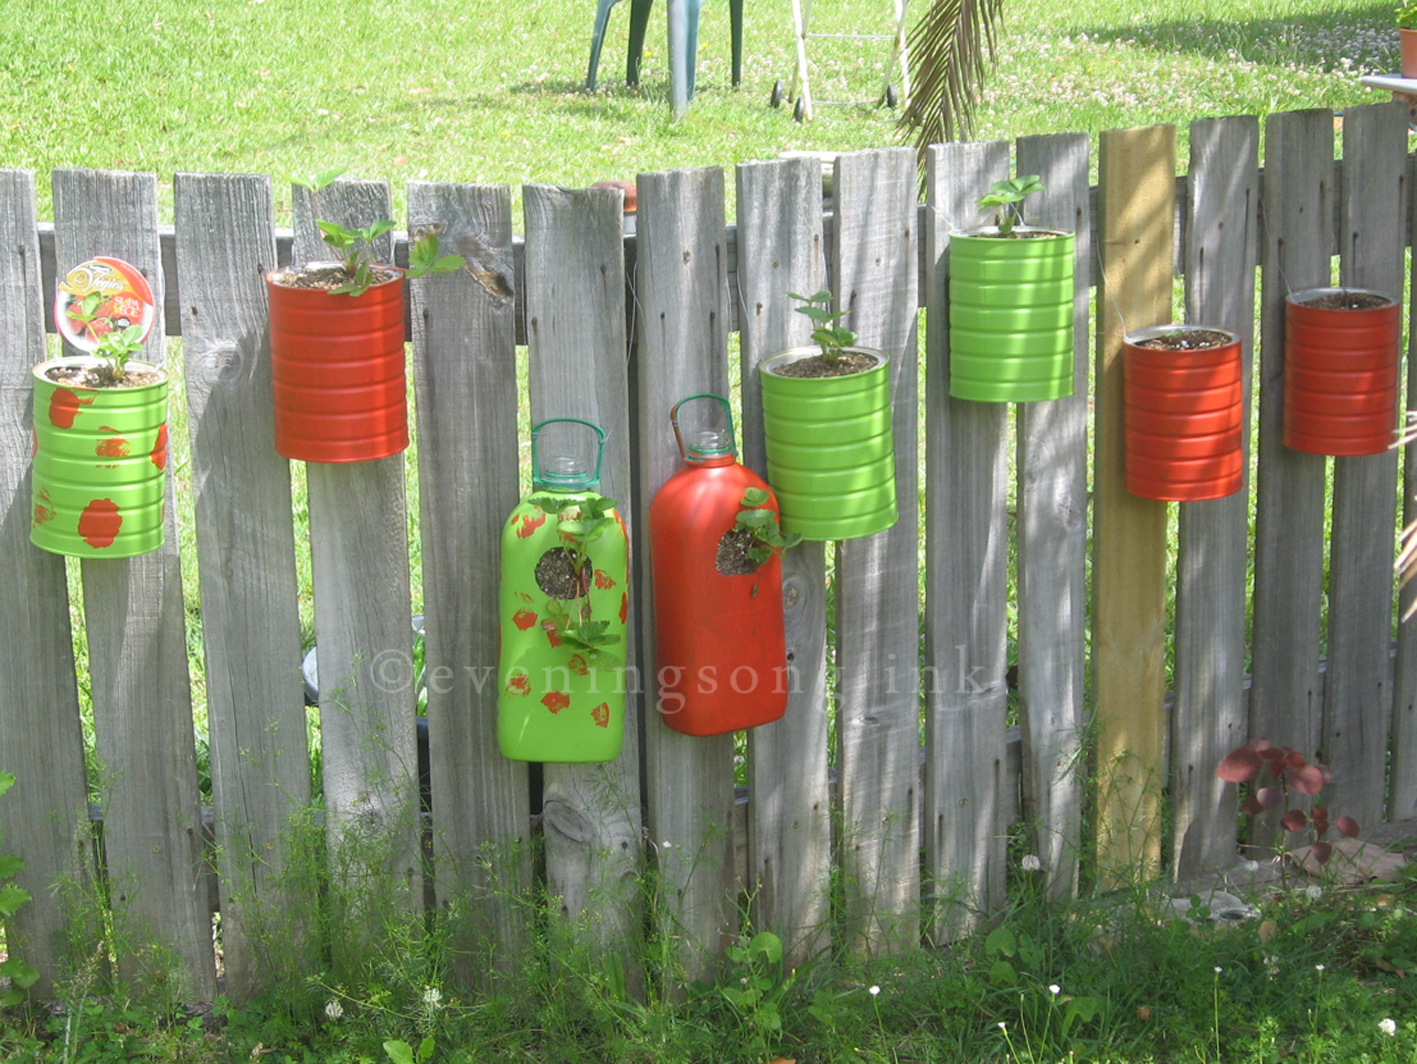
Cheering up your own garden or awaiting a new home :)
Tuesday, November 29, 2011
A miniature dinosaur garden - tutorial
Here's the low-down, my son loves dinosaurs.
Seriously.
Five minutes with him and you'll not only learn something new but tie your tongue in knots attempting to repeated the bloody names.
He's such a show-off :)
So what do you do for your dinosaur-obsessed kid? Make him his own dino garden, of course! This would be a wonderful gift for any adventurous young soul and can be customised for jungle animals, dogs, fairies, you name it.

Materials:


Seriously.
Five minutes with him and you'll not only learn something new but tie your tongue in knots attempting to repeated the bloody names.
He's such a show-off :)
So what do you do for your dinosaur-obsessed kid? Make him his own dino garden, of course! This would be a wonderful gift for any adventurous young soul and can be customised for jungle animals, dogs, fairies, you name it.


Materials:
- Large shallow tray with holes in the bottom (you can buy from a garden stockist but mine came from the recycling centre)
- Old newspapers or junk mail
- Potting mix
- A selection of small plants
- Plastic animals (or figurines made from an outdoor-friendly material)
- Rocks, twigs, nuts, sand etc


- Grab your tray and line it with newspaper/junk mail
- Fill the tray 3/4 full with potting mix
- Lay out your plants (still in the pots), figurines and ornaments until it looks just right
- Plant your plants and mould the potting mix to achieve hills and valleys for your other adornments
- We added a rock path, scattered some sand over the top and sprinkled in some flower and lettuce seeds (to feed the dinosaurs of course!)
- Find a good place for your miniature garden, keep in mind the preferences of your plants. The idea is that the kids can play with their garden, but it would be best not to keep moving it about
To make this an ultimate gift how about:
- Package all the materials into a DIY garden
- Include a gift basket with a completed garden. With little garden gloves, a packet of seeds, mini watering can, extra animals and a little vial of fairy dust for fairy gardens
- Make a custom sign for the garden with the recipient's name on it
Subscribe to:
Posts (Atom)